Wednesday, June 29, 2016

Some more In the Garden CD Inspiration

Hello All and welcome back to 

Sherri's Art Blog!

This Month I have been having some fun creating with another of Sherri's wonderful CD's

In the Garden


 Here are a few pictures of the fabulous images you get in this In the Garden CD

Design Papers
Digital images to color


I have  used the Coloured Printable Images

 from the CD to make gorgeous and fun 3D Images for my cards!

And I have also used the Printable Papers that come with the CD as well!

And here they are: 


I hope you will try out some of these wonderful CD's,

I love them and so will you!

Shop for Sherri's My Besties product at her stores online:

MyBestiesShop.com

or at her Etsy Store here.


Love and hugs

Julie xox

Friday, June 24, 2016

Let's put our Apron's on My Besties Style


Hello, My Fellow My Besties Followers


Antoinette here today sharing with you my Apron card project featuring some more fun images, papers and elements you get "In the Garden" CD.
http://www.mybestiesshop.com/store/p838/CD_ROM_Digital_Digi_Stamps_Color_images_Card_toppers_Papers_and_MORE_100s_of_Images_Big_Eyed_Art_My_Bestie__By_Sherri_Baldy.html


My apron card is 5 1/2 by 4 1/2 Spellbinders Nestabilites Grand Calibur Scallop die cut shape.


I then did the same to the design paper I chose to cover the apron card foundation. Next process I got my elements together that I wanted to put on the card which are strawberries and a couple of different flowers that came in the CD. As you see in the picture below I tweaked one of the yellow flowers by adding pink with my color pencil blending it in. I chose another sheet of designer paper that came in the CD to make some tags using the Spellbinders Shapebilities 'Back to Basic Tags' to put in a pocket I created on the front of the apron card.

 I used my McGill embossing tools to create a dimension on my strawberries and flowers that came "In the Garden" CD.

Here is a a side look at the Apron card with special close ups of the adorable elements added.


Hope you enjoyed my Apron card project and you give it ago tweaking to your liking. Especially seeing how you can use all the different fun elements, images and papers you get in the My Besties CD Collection's. They are a crafters treat to have and play with.
 

www.antoinettesfilledheart.blogspot.com
Don't forget to go by the My Besties Shop to check out all the fun crafty goodies for your fun projects.

Thursday, June 23, 2016

More than just a Pocket Letter: Alice themed ATC Mini Album

With the new Alice movie that just came out, I have
seen alot of ideas with Alice themes and just have
fallin in love with all the creations that I have seen.

I too decided to make a Alice themed project and just
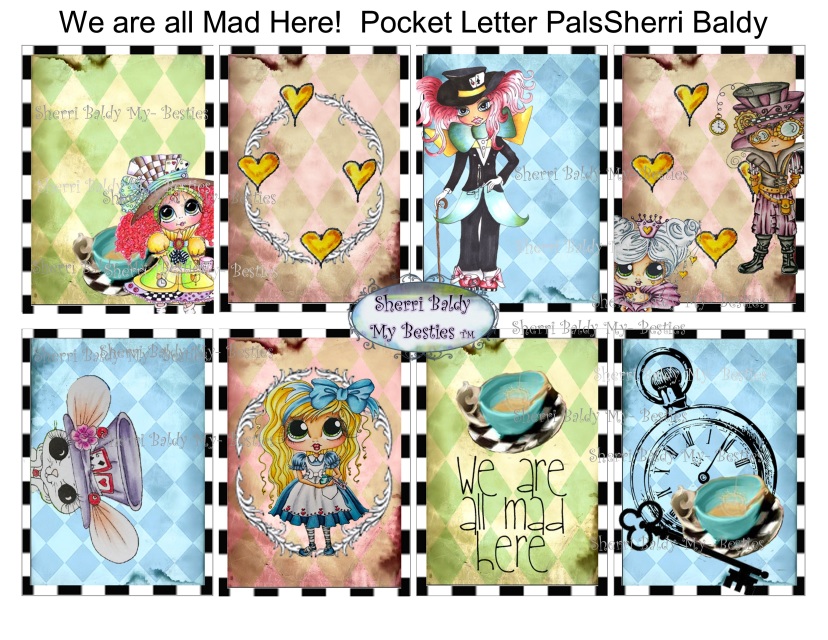
absolutely love the Alice in Wonderland "We are All Mad Here"
paper pocket letter from Sherri Baldy My Besties.


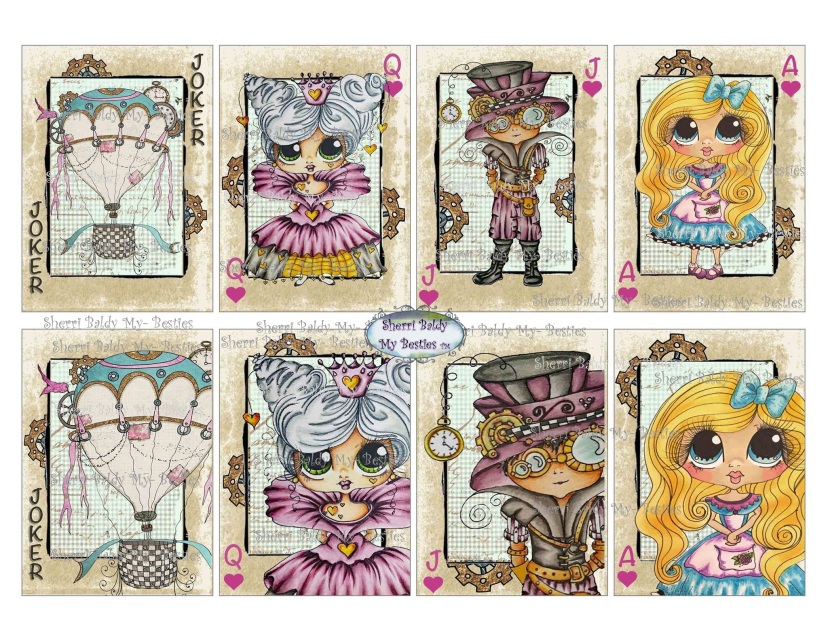
I also like the "Steampunk" paper pocket letter that looks
like playing cards.  They are so fun looking.


I decided to make a ATC sized Mini Album with
both of these paper pocket letter printables.  You just print and cut out
and you have your panels ready to go and decorate.


The size for the outside is 2 3/4" x 3 3/4" with the spine of 1 3/8".

The album has 4 pages with small elements on each one.

Here is the inside cover and page 1. 
I have made a video that I will post at the bottom here
so you can see how all the elements work.


Back side of page 1 and front of page 2


Back side of page 2 and front of page 3


Back side of page 3 and front of page 4


Back side of page 4 and back cover


For this album I have done a few charms with Shrinky Dinks.
I remember playing with shrinky dinks when I was a little girl
and was just over the moon when I found it at Michaels so
you could make your own designs and shrinkies.


I took one of the pocket letter printables and printed on the shrinky
sheet along with the bottle image.  I colored the bottle image
with colored pencils and popped them in the oven.  
Just remember that they shrink.  There is a chart to help
you decide what size to print before shrinking to get the size you want.


I only used to images from the "Steampunk" 
paper pocket letter for the front of my album.
Love the look of playing cards.
The bottle is the same bottle I used for the charm.  I just
cut the Drink Me part off of the charm before shrinking.


Here is the video so you can see how it all works.


There are more Alice themed printables and digis available from 


You can find them all HERE

And also there is a sale on printables and digis only
with coupon code

YOURSPECIAL50

Hope you have enjoyed todays little mini.

See you next time.


Wednesday, June 22, 2016

Puppy Love and Winter Wonderland: Coloring Fun


Hi Besties!!!!  We are soooo excited about this holiday that
we got a head start on our "Christmas in July" Release.

Introducing the newest coloring book
"Winter Wonderland"

All My Besties coloring books are packed with 50 pages
of coloring fun.  That is 25 images, 2 of each image
for you to create with.


Not only do we have this one, there is also a new book
full of "Puppy Love"


Grab your pencils, markers, watercolors, whatever you
love to use and join us in coloring one today.

You can find these and all of My Besties coloring books on Amazon
found HERE


Make sure to pop on over to 
on Facebook and share all your colorings with us!


Come on over and shop for 50% off
printables and digis with coupon code

YOURSPECIAL50

Tuesday, June 21, 2016

Let's Make a Perpetual Calendar

What do we have for you today?

Why not make a perpetual calender to sit on your desk or
in your craft room.  I have made this one with the
New Pink Flower Power Designer Papers and printable.


Let's have a look at what I have used and how to make one for yourself.


Here is the paper pack that I used to decorate my calendar
You can find it HERE


The printable I used to add the topper matches the paper pack.
You can find it HERE

I started with making my cubes by using a 8.5 x 11 sheet of cardstock.  One
sheet per cube.

Score at 1/2", 3", 5 1/2" and 8' with the 8 1/2" side on the top.
 Turn the cardstock so the 11" side is on top and score 
at 1/2", 3", 5 1/2", 8" and 10 1/2"

You need to add a score line on 2 of the flaps to make tabs to glue
your cube all together.  Follow the diagram and cut all the areas
out to leave you your cube base.
This is just the way I learned to do cubes, but sure there are many 
other ways.  My cubes have a cube face of 2 1/2" when assembled.

I cut my paper to at 2 1/4" to decorate each of the cubes. 6 per cube.


I also cut a white panel to hold my numbers. 

Here is the numbers you will need for each cube so
you have the right numbers to cover each day of the month.

Cube 1: 0, 1, 2, 3, 4, 5
Cube 2: 0, 1, 2, 7, 8, 9

Make sure to use a die, font (if printing numbers) that has a 9 or 6 that can be
flipped over to use as the 6 and 9 together.

I distressed all the edges before putting together.


The base is from cardstock cut at 5 3/8" x 11"


Score on the 11" side at 1/2", 2 1/2", 3 1/8", 5 7/8"

You want the bottom of the stand to slope
down in the back for the cubes to sit at a slight angle.


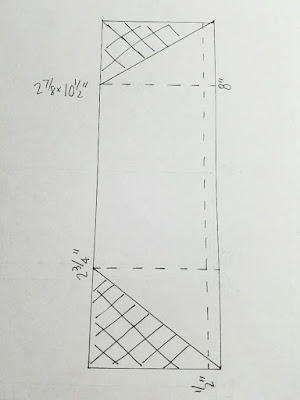
To add a support and help hold the cubes on the stand, I took a piece of cardstock
2 7/8" x 10 1/2"


With the 10 1/2' side on top, score at 2 3/4", 8"
I added a 1/2" score line on one of the side of  to use as
tabs to attach to the bottom of the base.
Follow the diagram to cut the side panels.


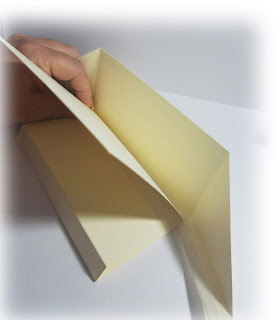
This is how I attached the support panel.  Wrap around and secure
the tabs to the bottom and the back to the panel.


Now you are ready to decorate and add all your goodies.
I started with adding a Spellbinders Labels 25 die cut to hold
my printable and any embellishments.


I cut my printable on a Spellbinders loopy oval and threaded
organza ribbon through the loops and added a bow on the top.


The flowers I have used are

and

Both can be found in the


I have added a small clothes pin to the back on one side
to hold the name of the months.  
Just print the names of your months and
use a punch or die cut to cut them out.


We would love to see your creations.
Come and join us and share at
on Facebook


Come on over to MyBestiesShop.com
 and use coupon code

YOURSPECIAL50

for 50% off your printable and digi purchases