What do we have for you today?
Why not make a perpetual calender to sit on your desk or
in your craft room. I have made this one with the
New Pink Flower Power Designer Papers and printable.
Let's have a look at what I have used and how to make one for yourself.
Here is the paper pack that I used to decorate my calendar
You can find it HERE

The printable I used to add the topper matches the paper pack.
You can find it HERE

I started with making my cubes by using a 8.5 x 11 sheet of cardstock. One
sheet per cube.
Score at 1/2", 3", 5 1/2" and 8' with the 8 1/2" side on the top.
Turn the cardstock so the 11" side is on top and score
at 1/2", 3", 5 1/2", 8" and 10 1/2"
You need to add a score line on 2 of the flaps to make tabs to glue
your cube all together. Follow the diagram and cut all the areas
out to leave you your cube base.
This is just the way I learned to do cubes, but sure there are many
other ways. My cubes have a cube face of 2 1/2" when assembled.
I cut my paper to at 2 1/4" to decorate each of the cubes. 6 per cube.
I also cut a white panel to hold my numbers.
Here is the numbers you will need for each cube so
you have the right numbers to cover each day of the month.
Cube 1: 0, 1, 2, 3, 4, 5
Cube 2: 0, 1, 2, 7, 8, 9
Make sure to use a die, font (if printing numbers) that has a 9 or 6 that can be
flipped over to use as the 6 and 9 together.
I distressed all the edges before putting together.
The base is from cardstock cut at 5 3/8" x 11"
Score on the 11" side at 1/2", 2 1/2", 3 1/8", 5 7/8"
You want the bottom of the stand to slope
down in the back for the cubes to sit at a slight angle.
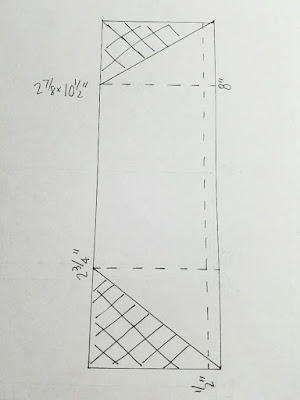
To add a support and help hold the cubes on the stand, I took a piece of cardstock
2 7/8" x 10 1/2"
With the 10 1/2' side on top, score at 2 3/4", 8"
I added a 1/2" score line on one of the side of to use as
tabs to attach to the bottom of the base.
Follow the diagram to cut the side panels.
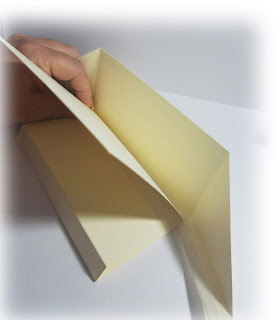
This is how I attached the support panel. Wrap around and secure
the tabs to the bottom and the back to the panel.
Now you are ready to decorate and add all your goodies.
I started with adding a Spellbinders Labels 25 die cut to hold
my printable and any embellishments.
I cut my printable on a Spellbinders loopy oval and threaded
organza ribbon through the loops and added a bow on the top.
The flowers I have used are
and
Both can be found in the
I have added a small clothes pin to the back on one side
to hold the name of the months.
Just print the names of your months and
use a punch or die cut to cut them out.
We would love to see your creations.
Come and join us and share at
on Facebook
Come on over to MyBestiesShop.com
and use coupon code
YOURSPECIAL50
for 50% off your printable and digi purchases


Gorgeous project Heather
ReplyDeleteWow what a stunning and pretty idea for a calendar. The new Bestie is so cute. Thanks for the coupon xxx
ReplyDeleteHugs Desíre {Doing Life}
Amazing and gorgeous. Love this project. The papers are beautiful.
ReplyDelete