Saturday, May 30, 2015

CREATIVE TRENDS: Choosing Hair Colors

My Besties CREATIVE TREND: Choosing Hair Color!

Creative Team Member:  Beth
Shop this image here
Designing a project can sometimes be tricky, so do you pick your paper first or do you just start to color?  With this image the hair is the focus point and  being able to find a focus point of an image makes it so fun when we are creating, it's paper doll dress with a ton of different options

Beth designed her card and went with a darker shade of hair which complimented the color of the paper and the additional colors of the overall project.  Looking at the photos below you can see how the image took on a different look with each layer of color that she added


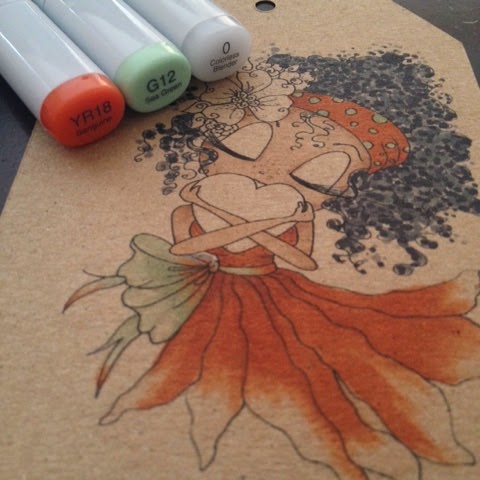
Here another example, the flowers had the red tones making it easy to choose reddish browns to color the hair and make the image pop against the paper

Creative Team Member:  Deirdre

Coloring is about experimenting to find the right combination that makes you happy

Thank you for stopping by, be on the watch for more Creative Trends from the team!!!


Wednesday, May 27, 2015

Easel and Criss Card featuring a Mirror as a Small Pond

Hello friends!!  I created this card with 110 lb cardstock as the base to make the card super sturdy, then added the pattern paper, and embellishments.  I colored the gorgeous Sherri Baldy stamp with my copic markers.  You can purchase the stamp here.  This card also features 2 pullouts for your special sentiments.  Hope you guys like it!!  Have a great day!!


If you look closely you can see the reflection of the gorgeous stamp in the mirror.  If looks like a small pond surrounded by beautiful flowers.


Here's another angle.


The gorgeous stamp.


And the final product.  

The following copics where used:
Hair:  E42, E43, E44
Skin:  E000, E00, E33
Dress:  Blues:   B000, B00, B02,   Pinks:  RV000, RV10, RV13
Ice Cream:  Blues:  B000, B00, B02,  Pinks:  RV000, RV10, RV13  Greens:  YG03, YG06
Grass:  YG03, YG06, YG09
Outline:  B000, B00

If you have any questions, please ask!  

Monday, May 25, 2015

COLORING ON KRAFT CARDSTOCK - DEIRDRE


Happy Monday Everyone...Creative Team Member Deirdre here on this Memorial Day Monday sharing my project using Kraft Cardstock.  This cutie pie can be found in the shop by clicking here.  I think one of the most amazing things about Sherri's images is the versatility and how easily you can change the look by what colors you choose


Using Kraft paper is one of the easiest ways I believe to achieve brown complexion.  Kraft paper is really porous so you need very little ink and a soft hand so that the marker does not stay on the paper too long and cause the color to bleed outside of the lines


This is a fun technique called "fade to white" or in the case "fade to Kraft". You saturate your area with the Colorless Blender then you flick on your color.  I did not go all the way down to the end of the dress, but I did go over the edges to soften them up a bit with the Colorless Blender


The jewels were a must for me, which I adhered with Glossy accents


 When you first put down your color, you will not see the full depth until it is dry, so don't be alarmed if it is a little muddy or very little color, trust me it's there


Hoping that you have a fantastic day and that you enjoyed this project.  Click here to purchase this beauty...Until next time thanks for stopping by the blog

Deirdre Smith, Glittered Roses


Thursday, May 21, 2015

Coloring and Creating

Welcome my coloring and crafty friends to Sherrie Baldy Art Blog. 

I am excited to share another one of my cards with you! 
What fun I had coloring and making this card. You can find the My Bestie image HERE.

I picked out some Spring time paper from Doodlebug. I must admit, sometime when grabbing colors I forget the importance of picking paper first. When I don't do this step first it slows me down. 


The image is "fussy cut" and backed with puff tape to give it a 3D feel. I also added yellow glitter to her bow, shoes and flowers to make them pop! The grass was a creation of my labor... I used the "flicking" technique to create the Illusion of her sitting. 
Learning to ground your images can be challenging but fun. 

Copic colors used
Skin: E21/11/13
Cheeks: E04
Pink: RV00/21/23/25
Green shirt: YG17/25/21
Yellow: Y18/15/11
Extra
Yellow glitter: Zazz/Honeycomb 


Monday, May 18, 2015

Pleats and shading

Hi everyone!  I'm Beth and I am a the newest member of Sherri's Creative Team. I am humbled and grateful to be a part of this group. That being said I am a total newbie to all this blogging and posting. I just started my own blog. Oh shoot, I just started really using Facebook in January so I many need a little grace.

Deirdre's post a couple of weeks ago was on shading so I thought I would continue with that subject. I chose this Bestie because she is adorable, and her dress really intrigued me. You can find this sweet image at Sherri's Etsy site, just click.


With this image I went light to dark with my Copic markers. I also stay in the same color families.
I have included all of the colors I used except what I used on the the ice cream. How the markers are laying is the order in which they were used.


I must say it took me a few times to decide how to handle the pleats. Go ahead and play a bit, it's just paper. Don't worry, these sweet girls won't get thrown away, I will keep them to practice hair or skin.


After I decided how I wanted to handle the pleats and what angle I wanted the light to hit the image, I continued to get darker with the colors. I was taught to look for places to add depth. Depth adds the dimension I enjoy trying to achieve. Trying.... and trying again. Sometimes I add so much ink, it bleeds through the paper! I can use a lot of ink some days.


Her hair was so fun.


I created a card with this cutie. The Stamps I used are from Stampin' Up.


I hope there was something you found helpful even if it was just color combinations you ended up liking. Please feel free to share your thoughts. I'm new at this and suggestions are helpful.

Please check out my new blog FromHandAndHeart.com. Please remember it is brand new.

You can find this Bestie at Sherri's Etsy site, just click.

Until next Time,

Beth


CREATING A SHADOW AROUND AND BEHIND AN IMAGE

Hello and welcome to the Creative Blog for Sherri Baldy.  Today's tutorial is all about shadows.  Coloring with Copic Markers for me is about the details, the little things that make an image stand out when you create your projects.


B02

Starting with the darkest color of my set for shadows I randomly colored close to the image


B01

Using my second color I went over the image and extended the color out and added random dots, this also gives texture and depth the to color


B000; B0000

Using both of these colors back to back I lightly went over the previous colors to blend and then I extended the color out and added more dots, repeating the process with the second color


B02; B01; B000; B0000

Using all 4 colors I did touch ups and added color where I thought needed more.  Even without coloring the image you can see how the shadows make the image appear to pop off the page.  Blue tones are my favorite to use with this technique, but you can use any color combination...To purchase this image click here

Thank you for stopping by the blog today


Wednesday, May 13, 2015

Sharon Sims

Hello Friends!!  Sharon here, and I would like to introduce myself.  I work with my husband in a family owned body shop business.  I also rescue cats/kittens that I have came across my path in life.

Now let's get down to business!  I was invited by Sherri to join this team of amazingly talented women.  I am super excited to share my first project with you guys.  This card was constructed with 110 lb card stock for the base.  Next I layered a couple of sheets of pattern paper.  I then added a cupcake wrapper across the top of the card, beautiful lace and flower trims, flowers, frontage embossing powder, a small sentiment, bows, a sweet charm, heart bling, beads, and of course the gorgeous My Bestie!! Here she is!  If you would like to purchase this digital stamp please click here.


Hope you guys like my project!!  I also have a YouTube Channel.  If you are interested in watching video's that I create please click here.  Have a great day!!

The following copic markers were used to color My Bestie stamp:
Skin:  E13, E00, E000
Skirt:  C3, C1, C00
Shirt:  RV10, RV000
Angel Wings:  C3, C1, C00
Hair:  E15, YR23, YR21
Eyes:  B00, B000
Outline: RV10, RV000

Monday, May 11, 2015

EASY SHADING FOR CLOTHING


It's a good day to be a Besties fan, today is Monday and I have an easy project tutorial that you can use when it comes to shading clothing.  For my project I have used this Big Eyed Big Head Doll img581 which can be purchased from the shop by clicking here


There are so many direction you can go when it comes to card making and using the Besties.  I incorporated an embossing folder to add texture to the card front and used a folder that went along with the head band


When I was looking for the perfect sentiment to go with this card I went to my stash and found this retired stamp from A Muse Artstamps, I do have to say the look on this dolls face and the way she is holding the heart just reminded me of a big box of chocolate


For this image I wanted to give some shadows so that the skirt would not be so flat.  Using my Copic Markers C00, C3, C5 I started with and colored the entire skirt with C00.  Next I decided where I wanted the deepest shadow, which in this case was on the fold of each layer (or the lines in the skirt) .  Following the line pattern lengthwise, I laid down my deepest color C5 and made a thick line.  Using C3 I repeated the previous step only overlapping the edge of C5 in order to blend and soften the color just a bit.  If you work fairly quick the ink will still be wet and you won't have to work so hard at blending.  Wanting to add more depth in spots I took my C5 and flicked in more color at the waist and at the bow and when I was happy I went of over the whole skirt lightly with C00 to blend all colors.

For me this is a quick and easy way to add depth when the skirt itself has shape but no print
  

I hope that you find this Monday tip for coloring your Besties helpful and if you want to purchase this image, click the link and you will be taken directly to the shop

Thank you so much for stopping by Sherri's Creative Team Blog

xoxo

Deirdre Smith, Glittered Roses


Friday, May 8, 2015

Cool Mom

Hola a todas!
Aquí nuevamente les traigo un video coloreando en esta preciosa imagen con una niña tomando una larga pila de helados!

Les pido disculpas de antemano, porque mi cámara no grabó el momento en que pinté el pelo de la niña, pero sí todo lo demás!

Espero que les guste el video y aquí les dejo el link a la tienda de Etsy de Sherri Baldy si quieren conseguir esta imagen!

Feliz Día de la Madre!


Hello to all ! Here again I bring a video coloring in this beautiful image with a girl taking a long pile of ice cream! I apologize in advance because my camera did not record the time I painted the hair of the girl, but everything else! I hope you enjoy the video and here's the link to the Etsy shop Sherri Baldy if they want to get this image! Happy Mother's Day !


Thursday, May 7, 2015

Tiffany Toldson

Welcome my coloring and crafty friends to the Creative Blog for Sherri Baldy My Besties. 


To start this party, let me tell you a little about myself. My Name is Tiffany, I'm a wife, mother of 6 girls and I LOVE crafts!

I have always been pretty crafty from sewing to scrapbooking and everything in between. However about 2 years ago I found my "craft love," Copics!
It all started when I wanted to make a personalized card and went to YouTube to find my answer. EVERY video I came across kept mentioning how they "colored this cute little image with their Copic markers." That lead me on a search to find out what the heck Copic markers were. Once I found them I felt like I had to have them (all) and know how to use them. I found a few digital artists and started coloring like crazy.
However at the end of 2014, I set a goal for myself to become a Design Team member. I knew it would take me coloring more and posting more on social media, so thats what I did. I created a birthday file that I would use as my source of card making. 
Then it happened... the amazing Deirdre Smith contacted me about My Besties DT and I knew it was going to be GREAT, so here I am and here's my first post!


I am so excited to share today's card with you! I enjoyed coloring this sassy Hippo, she can be purchased HERE                        


When starting a card project I like to choose my paper first (that doesn't always happen). This process helps me pick out my Copic marker colors and embellishments before hand so that I'm not all over the place.


Copic marker colors:
Body: C7/5/3/1
Lips: R24/21
Cheeks: R21
Eyes: W5/3
Clothes: BV00/02/13/08 and R:24/21
Extra:
The stamp is from Stampin' Up
Paper: Authentique from Hobby Lobby


Monday, May 4, 2015

COLOR ME THIS...

Welcome the the blog where you will can get crafty with the Creative Team.  We are always going to share something that you can try for yourself when you are working on your own projects, so today it's my turn and I wanted to talk color combinations for the Besties Boy's.  I love to experiment with Copic Markers because they blend so well.  To purchase the Big Eyed Besties Boy https://www.etsy.com/listing/230040705/instant-dowmload-digital-digi-stamps-big?ref=shop_home_active_1&ga_search_query=img579.


Here I have picked shades that are somewhat pale with pink undertones.  I did not want to go to light and not to dark sot that when I colored his hair I could used shades that were darker


This combination is a bit darker and I think would work well with red hair, in this case I would deepen the freckles on his face to really make them stand out for a red head


I remember when I started seeing combinations online, I would have never thought that using BV00 would work with any of the E shades, it just seemed so far from the color spectrum.  Yet here you can see it really allows you to give some deep shadows and yet have the pale skin.  I could see some dirty blond hair with this color combination...

I want to thank you for stopping by the blog, I am super excited because we will be revealing more of the team member this week and for the months to follow we will have alot of activity on the blog, bringing alot of ideas to help you out when you are creating.


Friday, May 1, 2015

Welcome from Sherry Baldy´s Creative Team!

Hola! Mi nombre es Micaela Ferrero y tengo el gran honor de presentarme como parte del equipo Creativo de Sherri Baldy My Besties!

Somos un gran equipo lleno de entusiasmo y muchas ganas de poder compartir con todas ustedes nuestros trucos y técnicas para colorear estos sellos digitales tan divinos!

Hi! My name is Micaela Ferrero and I have the great honor to introduce myself as a Creative Team Member for Sherri Baldy My Besties.

We are a great team full of enthusiasm and desire to share with you all our tricks and techniques to color these digital stamps!

El equipo completo esta formado por estas hermosas mujeres y yo!

The whole team are these beautiful women and I!

Sharon

Deirdre

Tiffany

Micaela

Una vez presentadas todas, van a comenzar a vernos muy seguido ya que vamos a subirles material muy entretenido para que se diviertan junto a nosotras!

Once presented all, you will begin to see us very often as we will uploading you very entertaining material to have fun with us!

Cada una se irá presentando de a poco en el primer post que les escriban. Hoy me toca a mi.
Mi nombre es Micaela Ferrero y tengo un blog dedicado específicamente a hacer tarjetas.
Aprendí por internet a hacerlas viendo muchísimos videos y asistiendo a muchas clases on line. Yo soy abogada, pero no ejerzo mi profesión desde hace mucho tiempo. Yo he podido dedicar mi  tiempo libre a hacer lo que más me gusta, compartir mi vida con mi persona favorita, mi esposo, viajar, hacer tarjetas y mandarlas por correo!

Each one will be presenting itself in the first post she writes. Today it's my turn.
My name is Micaela Ferrero and I have a blog dedicated specifically to cardmaking.
I learned over the Internet to make the cards watching many videos and attending many online classes. I am a lawyer, but do not practice my profession a long time. I could spend my free time doing what I love to do, to share my life with my favorite person, my husband, traveling, make cards and send them by mail!

Les sorprendería la cantidad de amor que se envía con una postal o tarjeta en el correo tradicional.
Amo el papel, no se como explicar este amor, ni como nació. Recuerdo que desde que comencé a viajar siempre guardaba todos los papelitos y recuerdos habidos y por haber que me traía de los viajes, junto al diario de viaje, el que me ayuda a recordar y revivir los viajes como si realmente hubiera sido ayer!

You would be surprised the amount of love that is sent to a postcard or card in the mail.
I love the role, I do not know how to explain this love. I remember since I started traveling always kept all the papers and memories that brought me travel along the travel diary, which helps me remember and relive travel as if it really was yesterday!

Bueno, pero basta de mi! Pasemos a la tarjeta!

Well, but enough of me! we go to the card!


Para este estreno elegí una imagen de todas las que Sherri me ofrecía que transmitía un poco de ese amor que uno deja en las cosas hechas a mano.

Esta imagen se llama Itchin To Stitch Susie y pueden conseguirla AQUI

For this premiere I chose an image that gives me a little of that love that one left in things handmade.

This image is called Itchin To Stitch Susie and can get it HERE

Para saber cómo coloreé la imagen y cómo hice la tarjeta desde el principio les dejo el video de mi canal de youtube para que puedan ver y disfrutar al máximo todo el proceso!

To learn how colored the image and how did the card from the beginning I leave the video of my youtube channel so that you can see and fully enjoy whole process!


Si quieres ver el video en HD haz click aqui y si quieres más información sobre los materiales que usé para hacer la tarjeta, puedes encontrarla en mi blog haciendo click aqui

If you want to see the video in HD click here and if you want more information about materials I used to make the card, you can find it on my blog by clicking here

Realmente espero que les haya gustado la tarjeta y que se animen a colorear sus propias imágenes con los sellos digitales The Besties y nos dejen algún comentario aquí debajo a todas!

I really hope you liked the card and you are encouraged to color your own pictures with digital stamps The Besties and leave us a comment below all!

No importa que idioma hables, te contestaremos!

No matter what language you speak, we will answer!


Micaela Ferrero :)