Showing posts with label Deirdre Smith Glittered Roses. Show all posts

Tuesday, September 1, 2015

MY BESTIES: MIXING IT UP!!!


Another new image from the August release and what a beauty she is

you can shop this image here


When I color I am learning to mix up my coloring mediums to get deeps shadows and accents.  For this Bestie I colored her with Copic Markers and Prismacolor Pencils and Gamasol.

Thanks for stopping by the blog

Deirdre Smith, Glittered Roses

Thursday, August 27, 2015

NEW RELEASE ALERT


Are you ready to do some coloring for Halloween?  
My Besties had a wonderful release party today and this is one of the cute images...
Shop this image here


Make sure and check out the shop to purchase the latest images and 3D images

xoxo Deirdre Smith

Thursday, August 20, 2015

LIFE IS SO BOO-TIFUL


New in the shop Boo Paper Pack
It prints out 6x6 and is so BOO-tiful
Click here to purchase


I printed the paper just shy of an A2 panel and paired it with chipboard embellishments from Echo Park


The colors were a perfect fit


Be sure and visit the shop 
To purchase this paper and so much more


Wednesday, July 22, 2015

USING DOTS TO COLOR CURLY HAIR


This month the team and I have been focusing on fun hair colors, so I took the opportunity to share a fun way I like to color curly hair using this new image

Like coloring straight hair I like to add the deepest color for shadows and depth, with the pen to paper dot method.  I wanted to create my shadows and depth around the face, head band, bow and the tips of the hair


Using the mid-tone color I made dots from the dark color moving out into the white space


Repeating steps 1-2 I added the lightest color filling in more of the white space


Repeating steps 1-3, 1 color at a time I continued to fill in the white space until I was happy


I like to add the little extra dots outside of the lines to give a little more character to the shape of the hair

I hope that you find this tutorial fun and will add it to your list of things to try


Monday, June 1, 2015

READY MADE CARDS FOR THE NEXT OCCASION - Deirdre


In my mind I try and imagine what more, what next, how can I use a My Bestie image this time?  Well today I thought about making the image smaller, changing the color and then making some blank stationary so that when I needed a quick card I would be ready.  You can purchase this image by clicking here


Not quite a 5 minute project, but for sure less than 30.  To get perfect placement for the actual card, I first printed an image for my template onto a piece of printer paper.  I secured the card panels one by one on top of the printed image, giving me perfect placement and then re-ran it through the printer.  I did not want the image to be in black so I changed the color to a shade of grey to give it a softer look.  I offset the image so that I will have room to add a sentiment later, a  few color blocks with some ribbon and just like that I have some ready made blank cards for the next the next occasion.   


Quick and easy, I hope you will give this technique a try this.

Thank you and until next time enjoy "creating something handmade"

Deirdre Smith, Glittered Roses


Monday, May 25, 2015

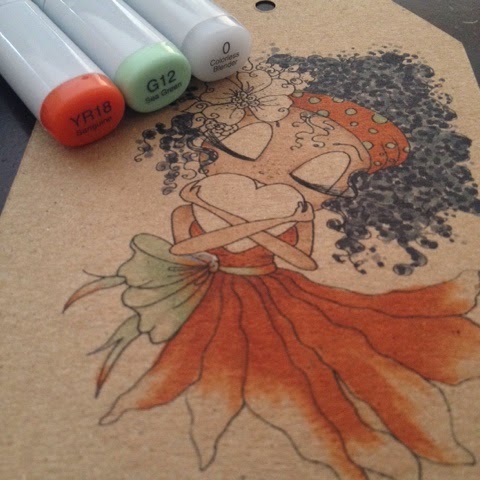
COLORING ON KRAFT CARDSTOCK - DEIRDRE


Happy Monday Everyone...Creative Team Member Deirdre here on this Memorial Day Monday sharing my project using Kraft Cardstock.  This cutie pie can be found in the shop by clicking here.  I think one of the most amazing things about Sherri's images is the versatility and how easily you can change the look by what colors you choose


Using Kraft paper is one of the easiest ways I believe to achieve brown complexion.  Kraft paper is really porous so you need very little ink and a soft hand so that the marker does not stay on the paper too long and cause the color to bleed outside of the lines


This is a fun technique called "fade to white" or in the case "fade to Kraft". You saturate your area with the Colorless Blender then you flick on your color.  I did not go all the way down to the end of the dress, but I did go over the edges to soften them up a bit with the Colorless Blender


The jewels were a must for me, which I adhered with Glossy accents


 When you first put down your color, you will not see the full depth until it is dry, so don't be alarmed if it is a little muddy or very little color, trust me it's there


Hoping that you have a fantastic day and that you enjoyed this project.  Click here to purchase this beauty...Until next time thanks for stopping by the blog

Deirdre Smith, Glittered Roses


Monday, May 18, 2015

CREATING A SHADOW AROUND AND BEHIND AN IMAGE

Hello and welcome to the Creative Blog for Sherri Baldy.  Today's tutorial is all about shadows.  Coloring with Copic Markers for me is about the details, the little things that make an image stand out when you create your projects.


B02

Starting with the darkest color of my set for shadows I randomly colored close to the image


B01

Using my second color I went over the image and extended the color out and added random dots, this also gives texture and depth the to color


B000; B0000

Using both of these colors back to back I lightly went over the previous colors to blend and then I extended the color out and added more dots, repeating the process with the second color


B02; B01; B000; B0000

Using all 4 colors I did touch ups and added color where I thought needed more.  Even without coloring the image you can see how the shadows make the image appear to pop off the page.  Blue tones are my favorite to use with this technique, but you can use any color combination...To purchase this image click here

Thank you for stopping by the blog today


Monday, May 11, 2015

EASY SHADING FOR CLOTHING


It's a good day to be a Besties fan, today is Monday and I have an easy project tutorial that you can use when it comes to shading clothing.  For my project I have used this Big Eyed Big Head Doll img581 which can be purchased from the shop by clicking here


There are so many direction you can go when it comes to card making and using the Besties.  I incorporated an embossing folder to add texture to the card front and used a folder that went along with the head band


When I was looking for the perfect sentiment to go with this card I went to my stash and found this retired stamp from A Muse Artstamps, I do have to say the look on this dolls face and the way she is holding the heart just reminded me of a big box of chocolate


For this image I wanted to give some shadows so that the skirt would not be so flat.  Using my Copic Markers C00, C3, C5 I started with and colored the entire skirt with C00.  Next I decided where I wanted the deepest shadow, which in this case was on the fold of each layer (or the lines in the skirt) .  Following the line pattern lengthwise, I laid down my deepest color C5 and made a thick line.  Using C3 I repeated the previous step only overlapping the edge of C5 in order to blend and soften the color just a bit.  If you work fairly quick the ink will still be wet and you won't have to work so hard at blending.  Wanting to add more depth in spots I took my C5 and flicked in more color at the waist and at the bow and when I was happy I went of over the whole skirt lightly with C00 to blend all colors.

For me this is a quick and easy way to add depth when the skirt itself has shape but no print
  

I hope that you find this Monday tip for coloring your Besties helpful and if you want to purchase this image, click the link and you will be taken directly to the shop

Thank you so much for stopping by Sherri's Creative Team Blog

xoxo

Deirdre Smith, Glittered Roses


Monday, May 4, 2015

COLOR ME THIS...

Welcome the the blog where you will can get crafty with the Creative Team.  We are always going to share something that you can try for yourself when you are working on your own projects, so today it's my turn and I wanted to talk color combinations for the Besties Boy's.  I love to experiment with Copic Markers because they blend so well.  To purchase the Big Eyed Besties Boy https://www.etsy.com/listing/230040705/instant-dowmload-digital-digi-stamps-big?ref=shop_home_active_1&ga_search_query=img579.


Here I have picked shades that are somewhat pale with pink undertones.  I did not want to go to light and not to dark sot that when I colored his hair I could used shades that were darker


This combination is a bit darker and I think would work well with red hair, in this case I would deepen the freckles on his face to really make them stand out for a red head


I remember when I started seeing combinations online, I would have never thought that using BV00 would work with any of the E shades, it just seemed so far from the color spectrum.  Yet here you can see it really allows you to give some deep shadows and yet have the pale skin.  I could see some dirty blond hair with this color combination...

I want to thank you for stopping by the blog, I am super excited because we will be revealing more of the team member this week and for the months to follow we will have alot of activity on the blog, bringing alot of ideas to help you out when you are creating.


Monday, March 16, 2015

MIXED MEDIA MINI WITH TOUCH OF STEAMPUNK


Hello and happy Monday....today I did something I think is pretty cool and could wait to get done and take the photos...I used this mini 6x6 album and altered it just a tad and used the awesome Steampunk image from the ETSY shop


What makes this so cool is that I printed the image on an old book page...yep an old book page.  Once you prime your surface with Gesso and let it dry your markers will not be affected by the ink of the page


I love how the words show through my coloring


I used Glossy Accents to accent the Monocle she is wearing


To add the extra texture I used a stencil and modeling paste, along with Washi Tape and some Studio Calico color mist


The trick to being able to color on the book page is to coat it with Gesso before running it through your printer.  I layered the paper with 1 coat and used my heat gun to fast dry the page.  Gesso is a primer and will prep any surface making it ready to add your favorite medium.  Again once the Gesso dries you now have a surface to work on that won't effect your markers


When I started to color with the markers over the Gesso the Copic Ink spread out like water color, so I love how the ink is a bit splotchy.  I was not sure what I was doing so I don't have an accurate coloring list, I do apologize.

Thank you so much for stopping by the blog and I hope that you have been inspired and will
"create something handmade"

Until next time

xoxo, Deirdre Smith